Thursday, January 28, 2010

Talkin' About Tools


I asked on facebook what people would like to see me discuss on this blog and the topic of tools was one that many people were interested in.

There are MANY tools that can be used on scratchboard, and your imagination is the limit.  I have scratched with a bobbi pin, spoon, dremel bits, electric eraser, pencil eraser, heck... you could even use a screw!  Anything that will remove the top layer of ink can be used :)

But I am going to touch on my primary tools that I keep in my tool box, both how to use them and where to get them.


LINE TOOLS
First we are going to talk about line tools.  The vast majority of MY work is done with the line tools, which I have photographed above.  I use them for fur, eyes, tongues, leather... well just about everything!  The fiberglass brush is not really a line tool, but I will get into its use in a moment.  The rest are used for... well lines :)  You really can get a very long ways in scratchboard with just a standard #11 exacto and for a very long time it was the only tool I used.  Older works of mine, such as "Dress Attire" were done all with an exacto.  You can see that even with just this one tool I was able to do a lot of different textures and shading.


In more recent years I have added to my tools to give more diversity in line width.  About two years ago  I got turned onto speedball scratchboard tips #112 and 113, which are available from http://www.danielsmith.com/.  These two tips produce wider lines than the exacto and are great for course fur and whiskers!  Then about 10 months ago I started working with a scalpel which yields finer lines than the exacto.  The blade is not as stiff as an exacto blade and required some getting used to.  The diversity of line widths that can be produced with these four tools adds to the realism of my work since fur does vary in texture and coarseness, and realistically I rarely reach for my exacto anymore, mostly using the speedball and scalpel blades.  Exacto blades can be purchased at any tool or craft store and scalpel blades at any medical center or veterinary supplies store (or many sources online as well).

Like all cutting tools, blades will get dull after some use.  You can resharpen some of these tools, but others you will just need new ones.  Since exacto and scalpel blades are pretty inexpensive I usually just replace them if dull.  You can tell if a blade is dull if it requires a moderate amount of pressure to remove the ink or is skipping.  For most of these tools only very light pressure should be needed to remove the ink.

SHADING TOOLS
As I said before you can get a long ways with just line tools, but there are certain effects that are tough to do all with lines.  Fortunately, unlike pen and ink, we have some additional tools that yield some softer effects than just lines.  The challenge with all of the shading tools is control, as they don't allow the finesse of the line tools.  At times masking off finer scratched areas may be required.

Sandpaper/foam nail buffer can take off a light layer of ink, but leave a toning of dark underneath with a fairly soft look to it.  Used in straight lines they yield a different feel and look than if used in a circular pattern.  For both tools use fine grit, as the courses grits leave an uneven look and feel.  Both of these will fill up with ink after a bit of use, so you will need to have multiple pieces on hand.  You can usually rip or cut sandpaper and use scissors to cut the nail buffers into the size/shape you want.  Sandpaper I purchase at hardware stores and nail buffers in the beauty supply section at the local grocery store.

Steel wool can be used for certain fur effects as well as shading.  It comes in several coursenesses and I personally prefer to only use the fine and medium.  Always make sure your steel wool does not have any oils or coatings on it.  It can be purchased where ampersand products are sold or hardware stores.

Fiberglass brushes can come in a variety of sizes.  I only use the very small and small sizes.  You will also find that different brands have different hardnesses to their bristles.  I primarily use a very small one that I buy from http://www.micromark.com/.  This tool requires some practice to get down and the tiny bristles will break off and can embed in the side of your hand (ouch!)   Gloves can help, but those bristles are so tiny they go through most fabrics as well.

Adding to the Supply Box
Another item to add to the supply box is black repair ink.  I use it for ink washes to tone down areas that are too light or can be used in concentrate to totally get rid of something.  I apply it with a small, inexpensive paint brush.

Here is a sample of the different thicknesses of lines from each tool.  The furthest left is applied with minimal pressure (to yield the thinnest line I can) and the right is with heavier pressure (to give a thicker line from each tool).  The dime is for size comparison.


And here is a close up on the mountain lion's legs with indication of what tools were used in each area... and some areas have more than one tool used in any specific area.


If you have additional tool questions please post them as a comment and I will try and address them.
more on Mountian Lion


Tuesday, January 26, 2010

Tiger Eyes

This was a small board that I started before Alamosa and worked on as a demonstration at the show.  It is a little 5"x7" piece and is available framed with museum glass for $400 (minus 15% from my winter sale!).  Don't miss out!  e-mail me for more info or to purchase.


Its been a little while

Well it has been a little while since I have had an opportunity to post.  I was preparing for my trip to the Alamosa scratchboard show called "A Scratch in Time".  It was a great time with friends and a nice show.  The venue was very nice and we had a Q&A panel with myself and a few other scratchboard artists that came to the show with about 70-100 college students.  I did not know that they were judging the show and only had small pieces entered, but was delighted to receive 3rd place in the whole show (about 75 works hung) with my cat scratch I titled "In the Light".

Some of the out of state artists stayed with me after the show for a day or two and now its back to the scratching post!

Over the weekend I did a few demos- one with the cougar and one with a small 5"x7" piece that I will post when I finish coloring it.  A few more hours on the cougar today too, and finally enough for an update.


Thursday, January 21, 2010

WINTER ART SALE!

I have started a winter art sale.  All original works are 15% off of the listed price if purchased directly from me.  You will also recieve a free 2010 calendar with your purchase.  This sale will go on through the end of March!  Don't miss out.

Wednesday, January 20, 2010

ASC Cloyde Snook Gallery features scratchboard art (01-15-2010)

Article from the Adams State college web site:


"Local artist, Charles Ewing, juried the current exhibit in the Adams State College Cloyde Snook Gallery. "A Scratch in Time" opens January 22 and continues through February 19. Over 20 artists are included in the exhibit. A panel discussion with a few of the artists begins at 4 p.m. Friday, Jan. 22, in the Art Building room 227; an opening reception will follow.

Scratchboard art is a technique to create drawing using sharp tools to scratch through to white clay board covered with black paint. Shadows and highlights are created through the removal process rather than adding color or ink, as in the traditional drawing method.

Ewing said scratchboard is a forgiving medium and very versatile. He said he chose to curate the show since there are few shows nationwide just for clay surface artists. The featured art is primarily realistic wildlife illustrations with some figurative and landscape work. "Some of the finest scratchboard artists in the nation, including an Australian artist, are included in the exhibit."

Artists who plan to attend the lecture, reception, and demonstration include Rodman, Cathy Sheeter, Mark Hatfield, Allan Adams, and Diana Bazaldua.

The public is invited to artist demonstrations from 9 a.m. until noon Saturday, Jan. 23, in the Art Building room 142.

"Ars Terrae", photographs by Martin Jay Mckee, will be on exhibit in the Hatfield Gallery during the same time frame.

For more information call the Adams State Art Department at 719-587-7823."

Friday, January 15, 2010

Some Close-Ups

I was not able to work on my art today, but rephotographed it and took some close ups.  Last night I made a bit more progress starting to fill in the main body.


Thursday, January 14, 2010

Lion Days

Most of today spent working on the lion's legs and minor chinges to the body shading


A visit to the Denver Stock Show

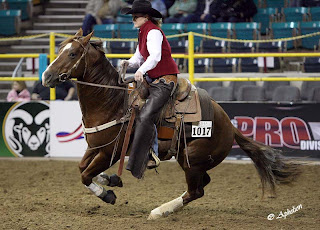
Yesterday I took the day to go to the Denver Stock show.  I was especially excited to watch and gather reference photos at the AQHA Ranch Horse championships... a competition that emulates more real working type events than most other horse shows events.  I missed the reining portion unfortunately but got to watch trail class, ranch riding and cutting.  Lighting in those buildings is pretty poor so I had to shoot high ISO and while not superb from a photography standpoint I gathered many usable reference photos for my artwork.  You can expect more horses soon!

Here are a few pictures, but as I said the light makes them not too great.  I'd love to photogrpah an event like this outdoors.


I also visited the Coors Western Art Show.  I am trying to get into this event again next year, so keep your fingers crossed for me.  This show always has outstanding western art and a good number of sales (about 70% were sold).  Gold frames seem to be "in".  For some reason I just have never really liked gold frames... but may give them a try just because they seem so darn popular. 

Here is the update on my cougar... hope to have an update on the graphite horse soon too, but what can I say I love scratching more than pencil these days!


Tuesday, January 12, 2010

Lines and Lions


OK, so I didn't get to my horse yesterday, but did spend more time on the lion.  Sometimes when you are in the groove it is easier to just stick with the same project than change mindsets.


Closer....

And CLOSER  (larger than life)...  Yes that is a LOT of lines!


Monday, January 11, 2010

2010 Calendar available again

After some quality control issues with the first batch of calendars I have now had them reprinted and they are available again for purchase.  You can find the images and order them from my web site at: http://www.aphelionart.com/2010calendar.html

Calendars can be shipped overseas and to Canada, but shipping would be a bit more.  Email me to inquire on the total price and how to send payment.

Thanks!


More cougar

I have spent the morning working on my cougar (a title is still in the works) and will spend the afternoon on my roping horse.

Here is where I am at on the cougar and a close up on the face, which covers roughly a 10"x8" area I would guess.  Obviously still much work to do on all areas of this board.


Saturday, January 9, 2010

Jumping Around

I have not given up on the horse by any stretch, but did start my large scratchboard and put a few hours into it already.  This board will be colored and it is a big'un at 36"x24" and much of the board will be covered with various elements.  This is only my 2nd board of this size... and my biggest challenge is figuring out how to hold it and manipulate to get where I need to.  I work most of my scratchboards with them in my lap.  I forget how big these boards are until I pull them out... twice the size of an 18"x24" (ok I know the math is simple... but its a lot of space to cover with scratches :) !

My primary reference photo was once again shot at Rolling Hills.  You could say that the SAA 2009 show opening was a great event for me on many levels... not only nice awards, the cover of the catalog and meeting great people- but a lot of wonderful and useful reference photos to work with!

Here is the start on her.  It'll be a fairly long journey with two projects underway, so hope you will hang on for the ride.  I'll take some close up photos next time I photograph it.  This is the whole board.


Thursday, January 7, 2010

Roping Box continued

Some more hours on the roping horse yesterday.  I am not sure how much time I will have to work on it today, as we have a new room mate moving in and have to clean out the room that is going to be hers.


Tuesday, January 5, 2010

New Drawing - "The Roping Box"

I started a new drawing... yes DRAWING yesterday.  I forgot how messy graphite is... lol... and keep thinking how I would do it in scratchboard!  It has been nearly 3 years sicne I have done a complete graphite drawing.  Size is about 16"x20"


A Few Backyard Birds

Well I do call this blog art and photography, but so far it has mostly been about art, and honestly will most likely continue to mostly be about art... but who says I can't toss in some photography every now and again.

Today I went up to Red Rocks in search of some environmental aspects for my next scratchboard.  I will be using a zoo animal as my primary subject, but since he is on an artifical platform I needed some natural elements to put him into the wild in my art.  Anyways I stopped at the trading post, where they have some bird feeders in their back area.  The primary birds I sighted in attendance were magpies, scrub jays, dark-eyed juncos (all colors forms), a few house finches and chickadees and one spotted towhee and one orange-shafted flicker.

Slate colored Junco


Chickadee


Pink Sided color Junco


Spotted Towhee


Western Scrub Jay

Pros and Cons of Using Zoo Photos for Art Reference

Zoos can be an amazing and invaluable resource for wildlife artists.  While most of us would love to travel to Africa, Asia, Siberia and other exotic locations to photograph our favorite animals in the wild, for most people, including myself this is not realistic.  However a trip to the zoo can give you some great references to work from.  Below are some of the advantages and things to be wary of when using zoo photos as reference for your art.

Pros of zoo photos for reference:

Readily available- most large cities and some small ones have zoos.  Cost to get into them is usually between $5 and $25.

Animals are in close proximity, enabling you to get close photos with even a medium sized zoom.  I often use my 70-200 lens on my DSLR, and occasionally make use of my 100-400mm lens.  The less expensive 70-300 lenses will work great too and since at most zoos the animals are outside in natural light the slower lenses do ok.

If one species is not active or sleeping, find another one!  Lots to choose from and check back later to see if your favorites are awake.  Most animals are more active earlier and later in the day and in cooler weather.  Winter can be a great time for a zoo trip!

Capturing the moment can be a challenge sometimes due to bars or plexiglass, but sometimes you can capture some unique behaviour up close and personal without risk of injury to yourself.  I have been just feet away from young grizzly bears wrestling- something I would never do in the wild!

Cautions of zoo photography references:

The animals are sometimes obese- something they pretty much never would be in the wild.  If you draw the animal in a wild setting the way you see it in the zoo think about this kind of thing.  Wild animals also tend to me more muscular since they have to actively work to get food.

Know your critter and its environment!  While your zoo photo may have a red panda up in a pine tree, you should make sure that that is a tree that you would find it climbing in the wild.  Got a great photo of a cheetah in the snow?  Not something you are likely to find in Africa!  Sometimes it will take research and additional photos to make sure that the animal and the environment you put it into are going to match up.

The challenges of bars and glare or scratched up plexiglass can be frustrating.  For bars try to get your camera lens as close to the bars as possible and zoom in.  Also the further the animal is from the bars the less they will show in the image.  Sometimes even with the best efforts you will get some 'shadow' bars.  At this point try to make sure that the most important things, such as the eyes of the animals are not obstructed.  For plexiglass also try to put your lens very close or right up against it.  Try to find an area with less scratches or frosted look to shoot from.

Reflections in the eyes often show the cage bars in them.  Use artistic license to remove the bars and put a more natural highlight.  Also sometimes the bars will leave shadows- you wouldn't want to put these in either.

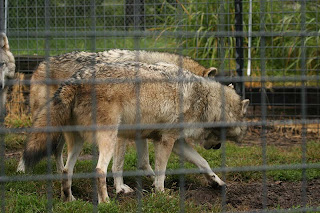
In this photo my lens is zoomed out and the wolves are about 20 feet from the bars.  The bars are very visible in the photo.  I can see enough details that this photo would still be usable for a reference.


This wolf is also about 20 feet from the bars, but I have now zoomed all the way in.  The bars are almost invisible.


A third wolf image, and again I quite zoomed in, but in this case the wolf is only about a foot from the bars.  As a result to the close proximity of the bars they are quite noticeable.  I try to make sure the eyes are not obstructed.   can use supplemental photos to get the nose and other details.


This mountain Lion photo shows some glare as a result of taking the photo through plexiglass.  Nevertheless, quite a usable reference as I can see all the details I need.


This cheetah has a look that will stop you in your tracks, but I could not paint him in the scene found in this photo.  This cat lives in Denver where it snows, but you are not going to find this in Africa!


This captive black bear is so fat that his stomach is nearly dragging the ground.  You would never find a bear this obese in the wild!

Friday, January 1, 2010

Happy New Year!

I hope everyone had a fun, safe and enjoyable new years!  Hard to believe we are sliding not only into a new year, but also a new decade!

I am very excited that I will be dropping down to part time at what has been my day job for the past six years as a dog groomer.  I will be working there only three days a week and doing art on the other days!  I had hoped to make this transition last year, but the state of the economy scared me into one more year of full time work, but I was fortunate that 2009 was my best year to date and I hope 2010 will continue my climb!  Nothing like trying to emerge as an artist when few people are buying art... LOL!  But I am really excited to have more free time to work on art as well as do marketing, travel to shows, etc. 

Some of my opening events for 2010 that I am planning on attending if at all possible are Adams State College Scratchboard Show In January (Colorado),  Bennington's "Art of the Animal Kingdom" in June (Vermont), Greeley Stampede Invitational Western Art Show in June (Colorado), Society of Animal Arts 50th Anniversary "Art and the Animal" in September (California); Birds In Art (Wisconsin).  I hope I will get to see and meet some of you there!

And this photo has nothing to do with anything, but was one of my favorite photos I took in 2009 of two wild fox kits at about 6 or 7 weeks old.